
Maintaining fitness and overall well-being becomes increasingly important as age advances. Yoga, in combination with a nutritious diet, plays a crucial role in addressing various issues associated with aging, such as weakened immunity, sleep difficulties, lack of concentration, and diminished memory. Regular practice of daily yoga asanas not only helps keep the body energetic but also enhances flexibility and mental focus. To stay fit and youthful in old age, incorporating specific daily yoga asanas into your daily routine can be beneficial. Here are some yoga poses that are particularly helpful for individuals over the age of 50:
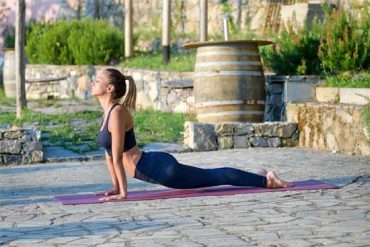
1. Trikonasana:

Trikonasana, also known as Triangle Pose, is a yoga posture that offers several physical and mental benefits. Here’s a step-by-step guide on how to perform it:

Starting Position:
- Stand straight on your yoga mat with your feet approximately 3-4 feet apart. Your feet should be parallel to each other.
- Keep your arms relaxed by your sides with your palms facing inward toward your thighs.
Raise Arms:
- As you inhale deeply, raise your right arm up toward the ceiling. Keep your arm straight and parallel to your head, with your fingertips pointing upward.
- Allow your left arm to remain alongside your left thigh, maintaining a straight line from your left wrist to your left ankle.
Body Tilt:
- While exhaling slowly, tilt your body to the left side, keeping your right arm extended.
- Imagine your body forming a straight line from your right fingertips to your right ankle.
- Avoid collapsing into the pose; instead, focus on elongating your torso and maintaining a strong, stable core.
Hand Positioning:
- Bring your right hand down toward your left leg, either resting it on your shin, ankle, or the floor outside your left foot, depending on your flexibility.
- Your left arm should remain extended upward, creating a straight line with your right arm.
Gaze Direction:
- Turn your gaze upward toward your left hand, maintaining a steady and relaxed gaze.
Hold the Pose:

- Hold the Trikonasana pose for 30 seconds to 1 minute, breathing deeply and evenly.
- Feel the stretch along the sides of your torso, from your fingertips down to your feet.
Release the Pose:
- To release the pose, inhale as you engage your core muscles and slowly return to an upright position.
- Lower your right arm to your side, bringing both arms back to the starting position.
Repeat on the Other Side:
- Repeat the same sequence on the opposite side, raising your left arm overhead and tilting your body to the right.
Remember to listen to your body and modify the pose as needed to ensure comfort and safety. If you have any existing medical conditions or concerns, it’s advisable to consult with a qualified yoga instructor or healthcare professional before attempting new yoga poses.
2. Bhujangasana:
Bhujangasana, also known as Cobra Pose, is a backbend daily yoga asanas that strengthens the spine and opens the chest. Here’s a step-by-step guide on how to perform Bhujangasana:
Starting Position:
- Lie down on your stomach with your legs extended straight behind you.
- Place your palms on the mat, near your chest, with your elbows bent and close to your body.
- Keep your forehead on the mat and your toes pointed.
Hand and Elbow Positioning:
- Ensure that your palms are facing downward, fingers spread wide.
- The elbows should be pointing upward, and your wrists should be in line with your chest.
Inhale and Lift Chest:
- Inhale slowly and press your palms into the mat.
- Use your back muscles to lift your chest off the ground. Keep your gaze forward, and avoid putting too much pressure on your hands.
Extend the Back:
- Continue to lift your chest and upper torso while keeping your pelvis and lower body on the mat.
- Straighten your arms as much as feels comfortable but keep a slight bend in the elbows.
Engage the Legs:
- Press the tops of your feet into the mat and engage your leg muscles.
- Imagine lengthening through the crown of your head and reaching your chest forward.
Hold the Pose:
- Hold the Bhujangasana for 30-60 seconds, breathing deeply and evenly. Keep your shoulders relaxed and away from your ears.
Exhale and Release:
- Exhale slowly and lower your chest back down to the mat.
- Relax your arms and rest your forehead on the mat.
Repeat:
- Repeat the process 3-5 times, gradually increasing the duration as you become more comfortable with the pose.
Remember:
- Avoid putting excessive strain on your lower back; the lift should come from the upper back.
- If you experience discomfort or pain, modify the pose or consult with a yoga instructor or healthcare professional.
This pose may not be suitable for individuals with certain back conditions, so use caution and seek guidance if needed.
3. Pawanmuktasana:
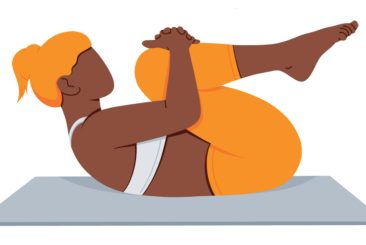
Pawanmuktasana, also known as the Wind-Relieving Pose, is a daily yoga asanas that helps in releasing excess gas from the digestive system and provides relief from bloating and indigestion. Here’s a step-by-step guide on how to perform Pawanmuktasana:
Starting Position:
- Lie down on your back on a yoga mat with your legs extended and arms resting by your sides.
- Keep your feet together and relax your entire body.
Leg Lift:
- Inhale deeply and raise both legs off the mat.
- Bend your knees and bring them towards your chest.
Interlock Fingers:
- Interlock your fingers and clasp your hands just below your knees. You can also hold your shins if clasping the hands is difficult.
Knees to Chest:
- Bring your knees closer to your chest by gently pulling them with your hands. Your thighs should press against your abdomen.
Nose to Knees:
- While keeping your chin tucked, try to touch your nose to your knees. This action helps in compressing the abdominal area.
Hold the Pose:
- Hold Pawanmuktasana for about 30 seconds, maintaining normal breathing. Feel the stretch in your lower back and hips.
Exhale and Release:
- Exhale slowly and release the pose, lowering your legs back to the mat.
Repeat:
- Repeat the entire sequence 10 to 15 times, maintaining a smooth and controlled movement.
Note:
- Ensure that your movements are slow and controlled to avoid strain.
- If you have any existing back or neck issues, consider consulting with a yoga instructor or healthcare professional before attempting this pose.
Pawanmuktasana can be a beneficial part of your routine for promoting digestion and flexibility in the lower back and hip area.
4. Utkatasana:
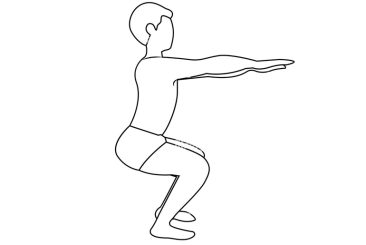
Utkatasana, also known as Chair Pose or Fierce Pose, is a daily yoga asanas that strengthens the thighs, hips, and lower back. Here’s a step-by-step guide on how to perform Utkatasana:
Starting Position:
- Stand with your feet together on a yoga mat, maintaining a straight and upright posture.
Feet Position:
- Keep a slight distance between your feet, about hip-width apart.
Arm Position:
- Inhale deeply and raise both arms above your head, parallel to each other, with your palms facing each other or touching.
Bend the Knees:
- Exhale and bend your knees as if you are sitting back into an imaginary chair.
- Keep your knees over your ankles, and your thighs parallel to the ground.
Torso Alignment:
- Lean slightly forward, ensuring that your back remains straight and not rounded. Your torso will naturally tilt forward as you lower into the pose.
Chair-Like Posture:
- Your body should resemble the shape of sitting in a chair, with your weight evenly distributed through your heels and the balls of your feet.
Hold the Pose:
- Stay in the Utkatasana posture for as long as comfortable, preferably 30 seconds to 1 minute. Breathe deeply and engage your core muscles.
Return to the Initial Stage:
- To come out of the pose, inhale and straighten your legs, bringing your arms back down to your sides.
Repeat:
- You can repeat the Utkatasana sequence as desired, but for beginners, starting with 3-5 repetitions is a good practice.
Tips:
- Keep your knees aligned with your second toe and avoid letting them collapse inward.
Engage your core muscles to support your lower back.
- If you have knee issues, be cautious and modify the pose by not lowering as deeply.
Note:
As with any exercise routine, it’s advisable to consult with a qualified yoga instructor or healthcare professional, especially if you have any existing health concerns or conditions, before starting a new yoga practice.
Disclaimer:
The information contained in this article is for educational and informational purposes only and is not intended as a health advice. We would ask you to consult a qualified professional or medical expert to gain additional knowledge before you choose to consume any product or perform any exercise.


