
Introduction:
Mobility exercises play a crucial role in promoting optimal health and fitness by improving flexibility, joint function, and overall range of motion. These exercises focus on enhancing the body’s ability to move freely and efficiently, which is essential for performing daily activities, sports, and maintaining a balanced fitness regimen. In the following sections, we’ll explore five effective mobility exercises that target different areas of the body, helping you achieve greater flexibility and joint mobility while contributing to your overall well-being.
1. Hip Circles:
Hip circles are a simple yet effective mobility exercise that helps improve hip flexibility, lubricates the hip joints, and enhances overall range of motion. Here’s how to perform hip circles:
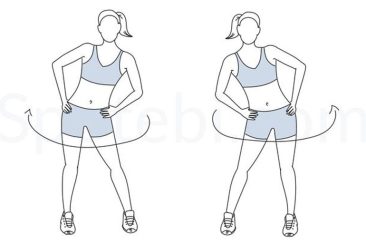
- Starting Position:
- Stand with your feet about hip-width apart.
- Place your hands on your hips for stability or let your arms hang by your sides.
- Performing the Hip Circles:
- Initiate the movement from your hips. Imagine your hips as a center point for the circles.
- Slowly begin to move your hips in a circular motion, as if you’re tracing a circle with your hip joints.
- Start by moving your hips forward, then to the side, back, and then to the other side.
- Complete the circle by returning to the front. This completes one repetition.
- Direction and Repetitions:
- You can start by making clockwise circles with your hips for a set number of repetitions.
- After completing the desired number of clockwise circles, switch to counterclockwise circles for the same number of repetitions.
- Breathing and Control:
- Breathe naturally throughout the movement. Inhale as you move your hips in one direction, and exhale as you complete the circle.
- Focus on making smooth and controlled movements. Avoid rushing or jerky motions.
- Repetition and Duration:
- Aim for 10 circles in each direction (clockwise and counterclockwise).
- You can perform 2-3 sets of hip circles as part of your mobility routine.
Hip circles are a great exercise to include in your warm-up routine before a workout or as part of a daily mobility practice. They help increase blood flow to the hip area, reduce stiffness, and promote better hip joint health. As with any exercise, be mindful of your body’s limits and avoid any movements that cause discomfort or pain. If you have any existing hip issues or medical concerns, consider consulting a healthcare professional before adding hip circles to your routine.
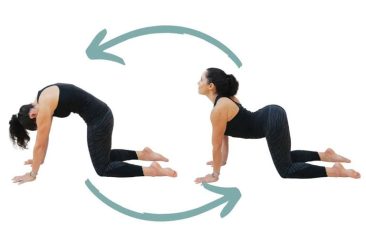
2. Cat-Cow Stretch:
The Cat-Cow Stretch is a classic yoga movement & Mobility exercises that helps improve spinal flexibility, relieve tension in the back, and promote better posture. Here’s how to perform the Cat-Cow Stretch:
- Starting Position:
- Begin on your hands and knees in a tabletop position. Your wrists should be directly under your shoulders, and your knees under your hips.
- Spread your fingers wide and engage your core muscles to stabilize your spine.
- Performing the Cat Pose (Round Back):
- Inhale deeply as you arch your back upward, dropping your belly towards the floor.
- Tuck your chin to your chest, allowing your head to drop slightly.
- Imagine you’re pulling your belly button up towards your spine to create a gentle rounding in your back.
- Hold this position for a moment, feeling a stretch along your upper back.
- Transitioning to the Cow Pose (Arch Back):
- Exhale as you transition into the Cow Pose.
- Drop your belly towards the floor, lift your tailbone, and arch your back, allowing your spine to curve downward.
- Lift your head and gaze forward or slightly upward.
- Keep your shoulders away from your ears and broaden your collarbones.
- Flowing Between Cat and Cow:
- As you inhale, transition back to the Cat Pose by rounding your back and tucking your chin.
- As you exhale, move into the Cow Pose by arching your back and lifting your head.
- Continue to flow between these two poses, synchronizing your breath with the movement.
- Focus on the fluidity of the motion and explore the range of motion in your spine.
- Repetition and Duration:
- Repeat the Cat-Cow sequence for about 5-10 cycles or as long as it feels comfortable.
- Allow the movement to be gentle and controlled and avoid any abrupt or jerky motions.
The Cat-Cow Stretch can be a beneficial addition to your daily routine, especially as a warm-up before exercise or to alleviate stiffness and tension from prolonged sitting. It helps increase flexibility in the spine, massages the organs in the abdominal area, and promotes relaxation. Remember to maintain a comfortable pace, and if you have any existing back issues or medical concerns, consult with a healthcare professional before performing this stretch.
3. Thoracic Extension Stretch:
The Thoracic Extension Stretch is a Mobility exercises that targets the upper and middle portion of your spine, promoting better posture and spinal mobility. Here’s how to perform the Thoracic Extension Stretch:
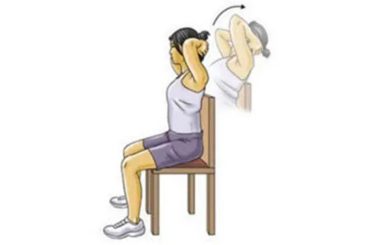

- Starting Position:
- Begin by sitting on the floor with your legs extended straight in front of you.
- Place your hands behind your head, interlocking your fingers, and gently cupping the back of your head. Your elbows should be pointing out to the sides.
- Performing the Stretch:
- Inhale deeply, lengthening your spine and sitting tall.
- As you exhale, gently arch your upper back, bringing your elbows towards each other and lifting your chest toward the ceiling.
- Allow your head to tilt back slightly, creating a curve in your upper back.
- Keep your lower back and lower ribs grounded on the floor.
- Hold and Breathe:
- Hold the stretch for a few breaths, feeling the extension in your thoracic spine (upper back).
- Focus on expanding your chest as you breathe in and maintaining a relaxed and controlled stretch.
- Return to Starting Position:
- Inhale again, and as you exhale, release the stretch by gently lowering your chest and head back to a neutral position.
- Relax your upper back and shoulders.
- Repetition and Duration:
- Repeat the stretch for about 8-10 times, gradually increasing the range of motion as your upper back becomes more flexible.
- Tips:
- Avoid pushing your head forward with your hands. The movement should come from your upper back.
- If you feel any discomfort or strain, ease off the stretch and do not force your spine into an extreme position.
The Thoracic Extension Stretch can be included in your daily routine, particularly if you spend long hours sitting or working at a desk. It helps counteract the effects of poor posture and promotes better spinal alignment. As always, listen to your body and perform the stretch within your comfortable range of motion. If you have any existing back issues or medical concerns, consult with a healthcare professional before attempting this stretch.
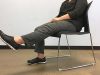
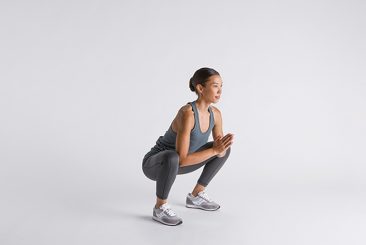
4. Deep Squat Hold:
The Deep Squat Hold is a Mobility exercises that helps improve hip and ankle mobility, stretches the lower body muscles, and promotes flexibility. Here’s how to perform the Deep Squat Hold:
- Starting Position:
- Begin by standing with your feet slightly wider than hip-width apart.
- Turn your toes slightly outward to allow for more comfortable hip mobility.
- Keep your arms relaxed at your sides or bring your hands together in a prayer position at your chest.
- Descending into the Deep Squat:
- Begin to slowly lower your body into a squatting position by bending at the hips and knees.
- As you squat down, imagine sitting back into an imaginary chair while keeping your chest lifted and your spine straight.
- Try to keep your heels on the ground if possible. If your heels lift, that’s okay; work on improving your ankle mobility over time.
- Squat Depth and Posture:
- Aim to lower your hips as close to the ground as you can comfortably manage.
- Your thighs can ideally become parallel to the ground, but it’s okay if you’re not able to achieve that depth initially.
- Maintaining the Hold:
- Once you’re in the deep squat position, focus on keeping your chest up, shoulders relaxed, and your core engaged.
- You can use your elbows to gently press your knees outward to help open your hips.
- Breathing and Duration:
- Take slow and deep breaths as you hold the squat position.
- Aim to hold the deep squat for 20-30 seconds or longer, gradually increasing the duration as you become more comfortable.
- Ascending from the Deep Squat:
- To come out of the deep squat, push through your heels and engage your leg muscles to stand back up.
- Repetition and Progression:
- Repeat the deep squat hold for 2-3 sets, gradually increasing the duration and depth of the squat as your mobility improves.
The Deep Squat Hold is a valuable exercise for improving hip and ankle flexibility, strengthening the lower body muscles, and maintaining a healthy range of motion. As with any exercise, listen to your body and avoid any discomfort or pain. If you have existing knee or hip issues, consult with a healthcare professional before attempting this movement. Over time, consistent practice can lead to improved mobility and overall lower body function.
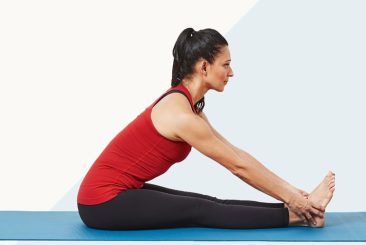
5. Seated Forward Fold with Shoulder Opener:
The Seated Forward Fold with Shoulder Opener is a yoga-inspired Mobility exercises that targets the hamstrings, lower back, and shoulders. It’s a great way to improve flexibility, release tension, and promote relaxation. Here’s how to perform the Seated Forward Fold with Shoulder Opener:

- Starting Position:
- Begin by sitting on the floor with your legs extended straight in front of you (staff pose).
- Sit up tall and engage your core muscles to support your spine.
- Opening the Shoulders:
- Extend your right arm out to the side at shoulder level, palm facing down.
- Inhale deeply and reach your left arm overhead, bending your elbow and allowing your left hand to come behind your head.
- Performing the Forward Fold:
- As you exhale, begin to hinge forward from your hips, leading with your chest and keeping your back straight.
- Reach your left arm diagonally across your body and try to clasp your right fingers or hold onto your right wrist.
- Continue folding forward, aiming to bring your chest closer to your right thigh while maintaining a straight spine.
- Breathing and Holding:
- Breathe deeply and hold the stretch for 20-30 seconds, allowing your body to relax and gradually sink into the stretch.
- Switching Sides:
- Release the stretch by gently lifting your torso and releasing your hands.
- Return to the starting seated position with both arms by your sides.
- Repeat the entire sequence on the opposite side, extending your left arm out and reaching your right arm overhead.
- Repetition and Duration:
- You can perform 2-3 sets of the Seated Forward Fold with Shoulder Opener on each side, gradually increasing the duration of the stretch as you become more comfortable.
- Tips:
- Focus on keeping your spine long and your shoulders relaxed throughout the stretch.
- If you’re unable to clasp your fingers or wrist, you can use a yoga strap or towel to bridge the gap between your hands.
The Seated Forward Fold with Shoulder Opener is a versatile stretch that combines hamstring flexibility with a gentle shoulder opening. It can be included in your daily routine, particularly after a workout or as a way to unwind and release tension. As always, practice within your comfortable range of motion and avoid any pain or discomfort. If you have any existing shoulder or back issues, consult with a healthcare professional before attempting this stretch.
Conclusion:
mobility exercises are a cornerstone of holistic fitness and well-being. By incorporating these exercises into our routines, we unlock a range of benefits that extend beyond physical flexibility. Enhanced joint mobility and improved range of motion contribute to better posture, reduced risk of injuries, and increased overall functional capacity. Moreover, mobility exercises facilitate the release of muscular tension, promote relaxation, and empower us to move with greater ease and grace. Whether as part of a warm-up, cool-down, or dedicated practice, prioritizing mobility cultivates a mindful connection to our bodies, ensuring we can navigate daily activities and athletic pursuits with confidence and vitality.
Disclaimer:
The information contained in this article is for educational and informational purposes only and is not intended as a health advice. We would ask you to consult a qualified professional or medical expert to gain additional knowledge before you choose to consume any product or perform any exercise.


