
In the midst of juggling various responsibilities such as caring for children, managing jobs, and attending to household chores, women often neglect their own health and well-being. Yoga asanas emerges as a sanctuary in this demanding scenario, providing a holistic approach to wellness. Beyond enhancing physical flexibility, this ancient practice serves as a nurturing space for mental and emotional resilience.
Acknowledging the multitasking nature of women, especially in the constant flurry of daily activities, yoga asanas offers beginner-friendly asanas that target the entire body. These practices not only promote physical fitness but also leave women feeling refreshed and energized, encouraging a crucial focus on self-care amidst their busy lives.
1. Viparita Karani (Legs Up the Wall Pose):
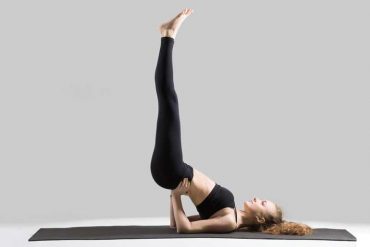

Viparita Karani, also known as Legs Up the Wall Pose, is a restorative yoga asana with rejuvenating benefits. It is particularly effective for increasing blood flow towards the brain and inducing a calming effect, leading to stress reduction and relaxation. However, individuals with certain health conditions should avoid this posture. Here are the steps to practice Viparita Karani:
Steps:
- Starting Position: Lie down on your back on the floor.
- Fold Knees Towards Stomach: Fold your knees, trying to move your legs up towards your stomach so that the thighs are touching and pressing your stomach.
- Lift Hips Above the Floor: While exhaling, lift your hips above the floor. Hold your waist from both sides using both hands during this movement.
- Raise Legs Ultimately: Continuing to exhale, raise your legs ultimately, allowing your body weight to fall on the elbows while the elbows are resting on the floor.
- Wall Support: You can use the wall for support while trying to get into this posture. Your legs may be extended up the wall, with your body forming an L-shape.
- Support for Beginners: Beginners can perform this pose by placing pillows, blankets, or bolsters under the waist. This provides support for the lower back and mid-back. Stretch your legs up the wall while allowing your shoulder blades and head to rest on the floor.
Benefits:
- Increased Blood Flow: Viparita Karani is effective for increasing blood flow towards the brain, which can be rejuvenating and energizing.
- Calming Effect: The pose induces a calming effect, promoting stress reduction and relaxation.
Caution:
- Individuals with hypertension, heart ailments, pregnancy, respiratory disorders, and spinal disorders should avoid this posture.
Note for Beginners:
- Using props like pillows, blankets, or bolsters under the waist is recommended for beginners to provide support and make the pose more accessible.
As always, it’s important to practice yoga asanas with awareness, listen to your body, and consult with a healthcare professional if you have any health concerns or conditions before attempting new poses.
2. Naukasana (Boat Pose):
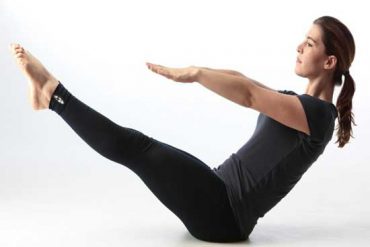
Naukasana, or Boat Pose, is a yoga asana that involves balancing on the sitting bones while lifting the legs and upper body to create a boat-like shape. This pose offers various physical and mental benefits. Here are the steps to practice Naukasana:
Steps:
- Starting Position: Begin by lying on your back (supine) on a yoga mat, with your legs extended and arms by your sides.
- Inhale and Lift Legs: Inhale as you lift your legs off the mat, keeping them straight. Engage your core muscles to support your lower back.
- Lift Upper Body: Continue to inhale as you lift your upper body off the mat, reaching your arms toward your lifted legs. Your body should form a V-shape.
- Balance on Sit Bones: Balance on your sit bones, keeping your spine straight. Your body should resemble a boat, with your legs and upper body forming the hull.
- Arm Extension (Optional): If comfortable, extend your arms forward alongside your legs, parallel to the floor. Keep your gaze fixed at a point on the horizon to help with balance.
- Hold the Pose: Hold the pose for a few breaths, breathing deeply. Focus on engaging the abdominal muscles and maintaining a strong, straight spine.
- Exhale and Lower: Exhale as you gently lower your legs and upper body back to the mat.
Benefits:
- Muscular Strength: Naukasana helps build muscular strength, particularly in the abdominal muscles, hip flexors, and lower back.
- Mind Focus: The pose requires concentration and balance, helping to focus the mind and improve mental clarity.
- Digestive Stimulation: Naukasana stimulates the digestive system, promoting better digestion.
- Energy Boost: Practicing Boat Pose is believed to boost energy levels in the body.
Caution:
- Pregnant women and those on their menstrual cycle are advised to skip practicing Naukasana. It’s important to modify or avoid certain yoga asanas based on individual health conditions.
As with any yoga asanas practice, it’s essential to approach Naukasana with mindfulness, listen to your body, and make modifications as needed. If you have any health concerns or conditions, consult with a yoga instructor or healthcare professional before attempting new poses.
3. Parivrtta Sukhasana (Revolved Easy Pose):
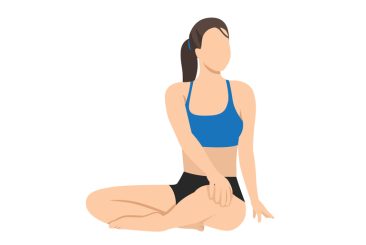

Parivrtta Sukhasana is a seated, cross-legged pose with a twist or revolved variation. This pose combines the simplicity of Sukhasana with a twisting motion, offering benefits for flexibility, stress reduction, and digestive stimulation. Here are the steps to practice Parivrtta Sukhasana:
Steps:
- Starting Position: Begin by sitting in Sukhasana (simple seated cross-legged pose) on your mat.
- Crossing Legs: Cross your legs at the ankles and place them to the side, finding a comfortable seated position.
- Palms Together: Press your palms together in front of your chest in a prayer position (Namaste).
- Hand Placement: Bring your hands down so that they rest on your knees with fingers pointing toward the floor.
- Twisting Motion: Turn your torso slightly away from the crossed leg by shifting your weight onto the outer hip bone closest to where you’re sitting.
- Deeper Twist: Continue to twist the torso further until the shoulder blades are touching each other behind your back. This twisting motion stretches the upper back and spine.
- Breathing: Keep holding the pose while breathing deeply. Maintain a steady and relaxed breath throughout the pose.
Additional Tips:
- Focus on the twist happening from the base of the spine, gradually moving upward through the entire length of the spine.
- The gaze can be directed over the shoulder of the twisted side, enhancing the twist.
Benefits:
- Flexibility and Stress Reduction: The twisting motion in Parivrtta Sukhasana can increase flexibility in the spine and reduce tension and stress.
- Upper Back and Spine Stretch: The pose specifically targets the upper back and spine, providing a stretch and promoting mobility in these areas.
- Digestive Stimulation: The twisting action massages the abdominal organs, stimulating digestion and potentially alleviating digestive issues.
Caution:
- Individuals with knee and ankle issues are advised to avoid this pose.
- Those with back problems should practice the pose gently with care and not overexert themselves.
As with any yoga asanas practice, it’s important to approach Parivrtta Sukhasana mindfully, listen to your body, and make modifications as needed. If you have any health concerns or conditions, consult with a yoga instructor or healthcare professional before attempting new poses.
4. Baddhakonasana (Bound Angle Pose or Cobbler’s Pose):
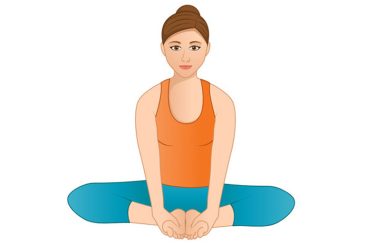
Baddhakonasana, also known as Bound Angle Pose or Cobbler’s Pose, is a beneficial seated yoga asana with various physical and therapeutic benefits. Here’s a breakdown of the steps and benefits mentioned:
Steps:
- Begin by sitting on your yoga mat with your legs extended straight in front of you.
- Bend your knees and bring the soles of your feet together, allowing your knees to drop out to the sides. Your feet should be close to your pelvis.
- Hold your feet with your hands. You can loop your hands around your feet and clasp your fingers, creating a bind.
- Sit up tall and lengthen your spine. Avoid rounding your back; instead, try to keep a straight and upright posture.
- Gently press your knees toward the floor, using your elbows to encourage a gentle opening in the hips. Avoid forcing the knees down; allow the stretch to happen gradually.
- Take slow and deep breaths, allowing the hips to open with each exhale. Focus on maintaining a relaxed and steady breath throughout the pose.
Benefits:
- Hip and Groin Opening: Baddhakonasana is known for its ability to open up the hips and groin, helping to increase flexibility and mobility in these areas.
- Regulates Bowel Movement: The pose is believed to aid in regulating bowel movements, contributing to better digestion.
- Stretches the Knees: This asana provides a gentle stretch to the knees, promoting flexibility and relieving tension in the joint.
- Stimulates Circulation in the Legs: The posture encourages blood flow to the legs, which can be beneficial for overall circulation and reducing fatigue.
- Relief from Standing and Walking Fatigue: Baddhakonasana is recommended for individuals who spend long hours standing or walking as it helps alleviate fatigue in the legs.
- Relieves Menstrual Discomfort and Menopause Symptoms: Practicing this pose may offer relief from menstrual discomfort and symptoms associated with menopause.
Caution for Injuries:
- It is important to note the caution for individuals with groin or knee injuries. In such cases, using a blanket under the outer thighs for support is advised. Sciatic patients should either avoid the pose or use a cushion to raise the hips.
Remember, it’s always advisable to consult with a yoga instructor or healthcare professional, especially if you have any existing health conditions or concerns before attempting new yoga asanas.
5. Malasana (Garland Pose):
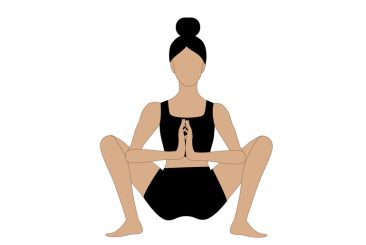
Malasana, or Garland Pose, is a yoga asana that involves squatting down on the floor. It provides various physical benefits, particularly engaging and strengthening muscles, as well as aiding in digestive health. Here’s a breakdown of the steps and benefits mentioned:
Steps:
- Starting Position: Begin by standing with your feet width apart on the mat.
- Foot Placement: Turn your toes slightly outward. This foot position makes it easier to squat deeply.
- Inhale and Squat: Inhale and bend your knees, lowering your buttocks to come into a squat position.
- Widen Knees: While squatting down, open your knees wider than your hip width.
- Palms Together: Once in a deep squat, bring your palms together in a prayer position (Namaste) before your chest. This gesture adds a meditative element to the pose.
- Maintain Posture: Keep your spine as straight as possible, and let your shoulders relax away from your ears. Your buttocks should move towards the floor.
- Hold the Pose: Stay in the pose for around five breaths, focusing on your breath and maintaining a comfortable position.
- Exiting the Pose: To exit the pose, slowly straighten your legs.
Additional Note:
- A forward fold can be done after Malasana. This transition helps in continuing the flow and releasing any tension in the lower back.
Benefits:
- Muscle Engagement and Strengthening: Malasana engages and strengthens various muscles, including quadriceps, hamstrings, lower back, and core muscles.
- Digestive Health: The pose compresses the abdominal area, which is believed to help eliminate digestive issues and bloating. This compression can stimulate and support the digestive system.
- Meditative Element: Bringing the palms together in a prayer position adds a meditative aspect to the pose, promoting mental focus and tranquility.
Caution:
- Individuals with lower back, hip, foot, or ankle injuries are advised to refrain from performing Malasana to avoid exacerbating existing issues.
As with yoga asanas, it’s essential to listen to your body and modify the practice based on your individual needs and capabilities. Consulting with a yoga instructor or healthcare professional is recommended, especially if you have any existing injuries or concerns.
Disclaimer:
The information contained in this article is for educational and informational purposes only and is not intended as a health advice. We would ask you to consult a qualified professional or medical expert to gain additional knowledge before you choose to consume any product or perform any exercise.


